
DIY Light Box


So this was an awesome Pinterest find that I was able to put together in less than 15 minutes!


I happened to have all the supplies already which made it all the more awesome!

Supplies:
1 Clear storage container (the lid for mine was white, so I simply turned the container upside down.)
1 string of twinkle lights (I used white, but different colors would create cool different effects)
A strip of wax paper the length of the container (this makes the surface opaque, which diffuses the light more evenly)
White duct tape ( any color would do, I just like the cleaner look of the white.)


Use small strips of tape to secure the twinkle lights evenly arranged on the bottom of the container, or in my case to the lid, since that was going to be the bottom of our light box. Leave the length of wire with the plug loose and make sure you have arranged the lights so as to have the plug where you will have ease of access to an outlet.


Secure the lid onto the container, be sure not to trap any bulbs between the lid and container as this could break the bulbs. The wire may easily fit between the lid and container, as it did in ours, but if you container has a more snug seal, you may want to cut a hole through the container large enough for the plug to fit through.


Lay the wax paper on top of the container and secure edges all around with white tape. This prevents tears along the edges. ( I know that we will have to periodically replace the wax paper on ours as it accidentally, or purposely, gets nicked and ripped.)

Plug in and enjoy!!


Kit loved putting together her gear set on top of the table and watching them spin over the glowing light.


Then Zak joined in and they used the Blockus pieces to create cool patterns on the surface, and then put on the crazy glasses from our Googley Eyes game to make some kaleidoscope like effects.


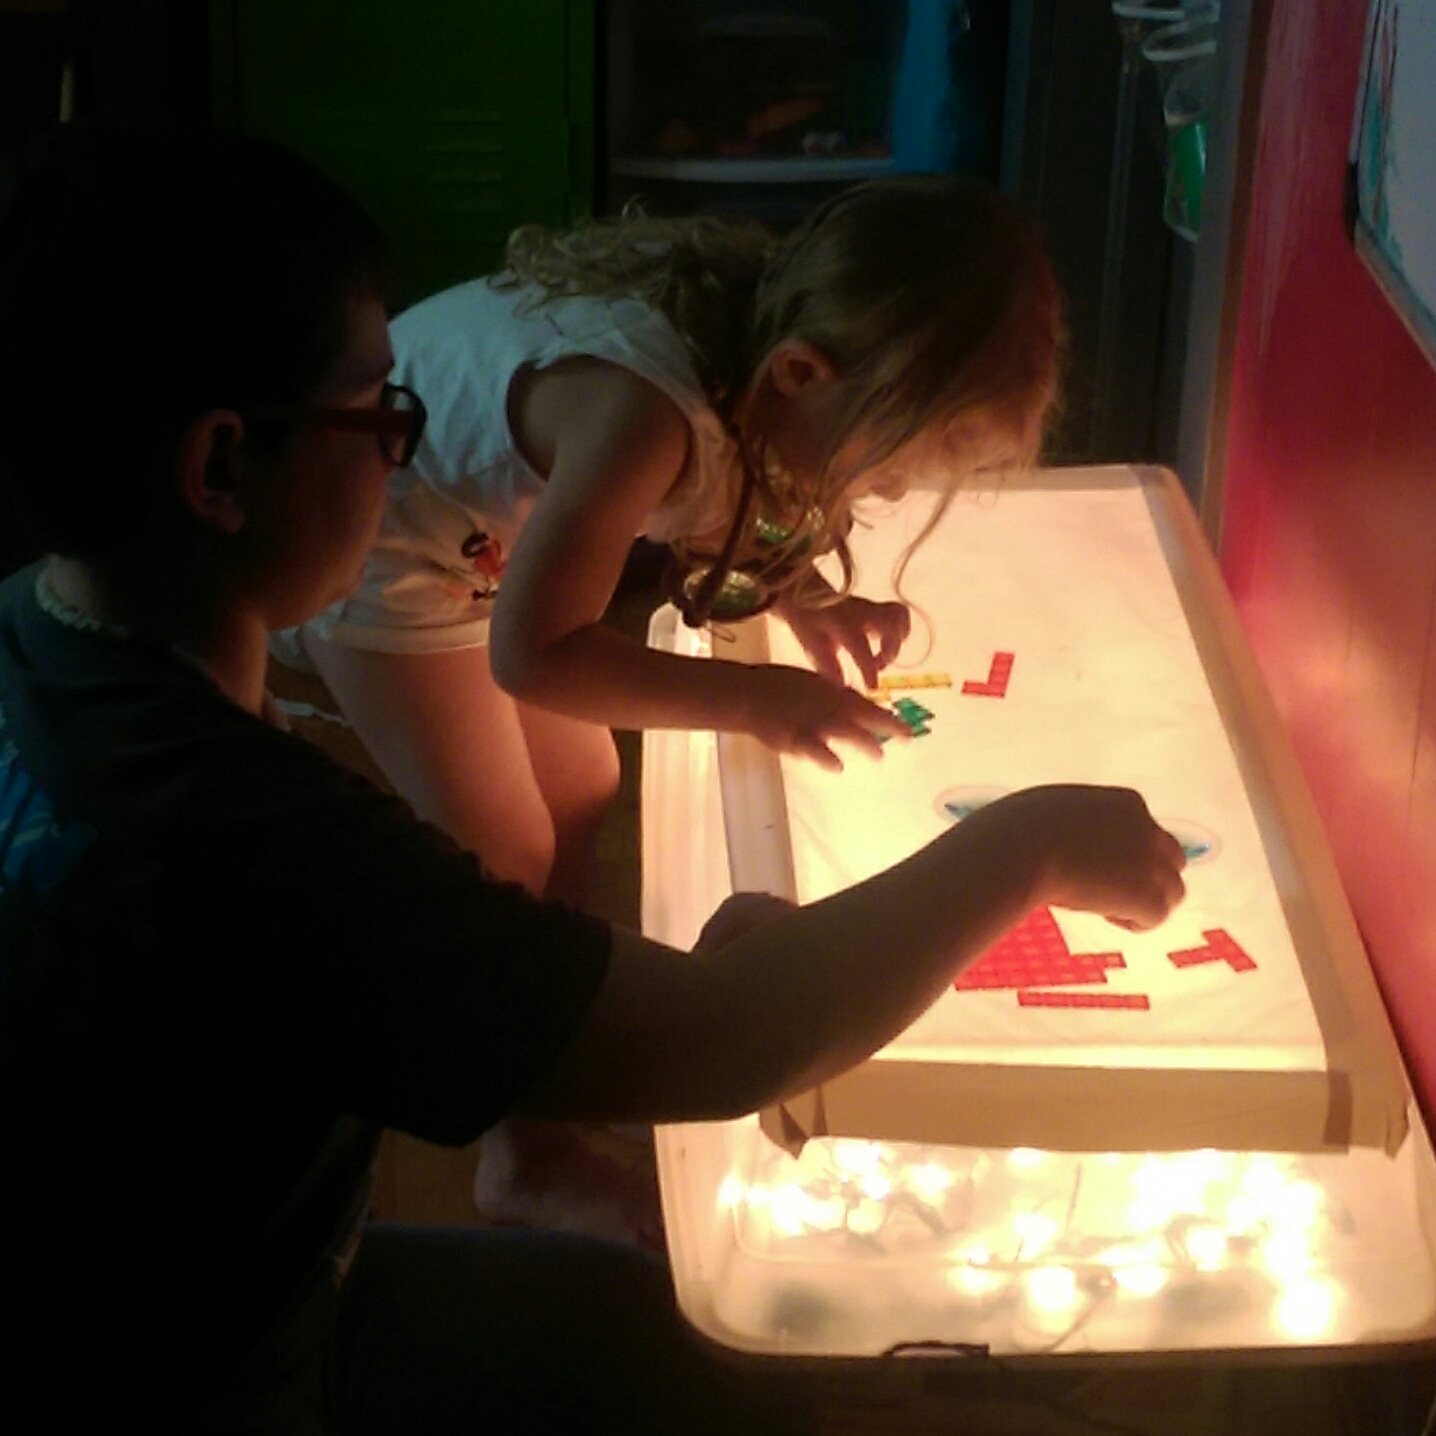
All in all, it was a quick, easy, and fun indoor activity. We used it a lot this summer when it was just too hot to play outside. But now that fall is here and winter soon to follow, this would make a great play station on those frigid days as well.


It also makes a lovely night light!


Comments

  1. This is such a lovely idea! I have children who will spend hours playing with a light box. Thank you so much for making an expensive toy a reasonable DIY gift. I have this pinned to my "to make for Christmas" board (which is a very exclusive board....FYI) Thanks so much. :)

    ReplyDelete

Post a Comment

Popular posts from this blog

Le Petite Chef: Mud Pie

Here it is, as promised, Grace's Mud Pie recipe! She did all the work, I helped explain terms and measurements, stirred at the very end to make sure everything was evenly coated (at her request), and helped hold the pot. She let one of her friends spread the Nutella and add the "dirt" to one of the pies while she did the other.  This is a very kid friendly recipe, I highly recommend it for ages 8 and up! The original recipe is in the book The Cooking Book, by Jane Bull. But we modified it just a bit. Here are our supplies: 3/4 c butter 1 tbsp cocoa powder 1/2 c sugar 1 c graham cracker crumbs 1/2 c dried fruit 1 chocolate bar (we used Nutella spread instead) We added: Heath chocolate and toffee bits Black Sixletts (found in the party aisle) These are the original measurements, we doubled the recipe though. Step 1: Crush graham crackers. We used a gallon size zipper bag and a coffee mug (I don't own

Preschool at Home! Chalkboard Painting

Here is another treasure from the backfiles. This started as an act of desperation on my part, I just needed her to be occupied so I could finish something, but it quickly became one of her favorite activities. If you have a chalkboard (we made ours on a half wall with chalkboard paint), all you need is a paintbrush, sponge, or washcloth, and a cup of water. Dip the brush in the water and have at it! Kit LOVES how the water turns the board black. So often, she will be at this so long that by the time she gets across the board, the first area she painted will be dry and a fresh pallet once again. You can get creative with the things you use as paintbrushes, but she has been completely happy with our basic art brushes from Walmart. I love watching her do this.

Saying Goodbye

For the entire month of August, I just didn't let myself think about it beyond the facts. For the last two weeks, I just focused on anything else that took my mind off of it. Over the weekend I was busy getting things ready, so I was too busy to think about it. Tuesday came. Miss V came. It was a good visit, with laughing and smiling, and questions asked and answered, and Kit played with her, and smiled and made us laugh like usual. But it was different, and we felt it. I didn't let myself go there, because I didn't want to break down, not that it would have been the first time in front of her (nor the second, or third, or even fourth probably.)  And then it was time for her to go, and we took some pictures, and all the kids hugged her, and I held Kit on my shoulder on the steps so she could wave goodbye until Miss V is out of sight like she has every week for at least five months. And then we closed the door, and Kit went on with business as usual, beca